
Installing dual servos
on the monster GT
|
|
|
|
|
AE steering kit #25125
AE hardware kit #25127
servo saver ( I use 2 kimbrough HD)
Y-connector
cable for servo
a dremel with cutting wheels and sanding stones or drums
|
|
|
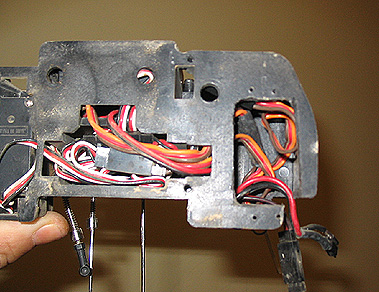
1.remove front aluminum chassis skidplate.
2.remove right steering bellcrank (the one
that doesn't have an arm that connects to servo),and replace with bellcrank from kit that has an arm
that connects to a servo.
|
|

|
3.measure a reference line from edge of chassis on left side to the lower edge of servo case (not including
the servo mount).see line "A" in photo.now measure a line on right side mud guard that corresponds to
the measurement you took on left side.see line "A2".
4.now you'll need to mark another line
using the length of the servo case you'll be using,mine was 40mm long so I marked a line 40mm up from
my first line.again when you measure make sure you don't include the servo mount in your measurement,just
the case part of the servo.see line "C"
5.now you need to mark the width of your servo case on
the chassis,you'll need to add a couple mm to the width so that you can adjust the placement of the servo
later.my servo case was 20mm wide so I marked the line at 23mm wide.see line "B".use the edge of the
ridge along the chassis (line "C"),as your starting point in your width measurement.
|
|

|
6.now you mark out a square using the measurements you took,and remove the radio tray.I used a utility
knife to cut the opening in the mudguard,you just pass it over the lines a few times and it'll cut through.I
chose this over the dremel because it does a cleaner job of cutting the opening.
7.once
you have the hole cut out,test fit the servo to make sure you can get it into the opening,it should also
be able to move a few mm from side to side if you cut the width out properly.
8.remove the
servo and fasten the radio tray back on (you don't need to connect the linkages since you'll be removing
the tray again).now using the opening in the mud guard,scribe the shape of the opening on the bottom
of the battery box.
9.remove the radio tray,take the switch off the battery box and remove any
wires that might be routed in the battery box.now use the dremel with a cutting wheel to cut out an opening
in the bottom of the battery box.
|
|
10.you'll also likely have to cut some of the corner of the battery box where the switch opening is
located.I chose to eliminate the switch all together and use a plug straight to my battery.if you
would rather keep the switch,you could cut out an opening on the top of the battery box to relocate it.
|
|

|
11.once you have the opening cut out,take your y-connector cable and plug it into the steering slot
in your reciever,and plug the steering servo into one of the ports on the cable.I chose to route my y-connector
into the battery box to give me easy access to the servo plugs..
12.pop the metal eyelets into
the draglink that came with the steering kit, then fasten the drag link for the second servo to the
bellcrank that you installed.now reinstall the skid plate and the radio tray.and hook up the left side
steering servo (the original one) to the leftside draglink.
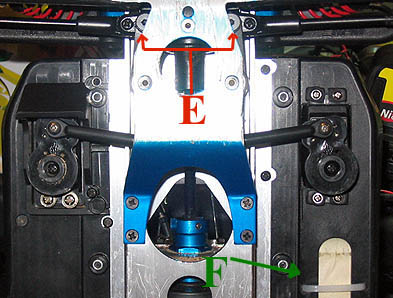
13.turn the electronics on (both radio
and reciever),and center your steering using your original (leftside) servo.I use the two screws that
fasten the bellcranks to the steering linkages as a reference point for center,see photo below.line "E",
|
14.now drop your second servo in and plug it into the Y-connector.use the draglink as a reference point
and install the servo saver onto the servo.this is where that extra width in the servo opening comes
in to play.move the servo from side to side untill the opening in the draglink eyelet lines up
with the hole on the servo saver that you're going to use.before you screw it on,do a sweep of your steering
with your radio to make sure that the servo savers will stay lined up from one steering end point to
the other,this will insure that your servos aren't stalling against each other while the steering is
cranked each way.if they line up ok throughout the sweep,go ahead and fasten the draglink to the
servosaver.
15.now with your servos centered and joined together,mark out the points where you'll
drill the holes to fasten the second servo on the chassis/battery box.**make sure all wires are out of
the way before you drill**
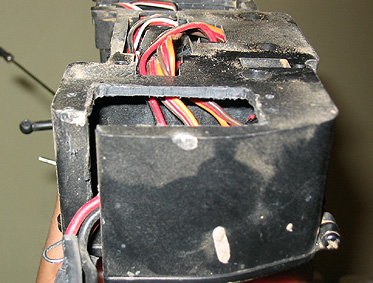
16.as you can see in the following photo,the bottom of the battery
box is pretty thick,it'll hold the servo in place without allowing any movement of the servo case.drill
the four mounting holes through the chassis/battery box using a drill bit that is smaller in diameter
than the mounting screws,this will ensure that the screws bite in good when you thread them on.
|
17.now fasten the servo to the chassis and make sure that the servos center properly,if they are you
shouldn't hear any buzzing from them when the steering is in the neutral position while the radio and
reciever are on.also take the time to check and set your steering end points.
18.now you just
need to decide where to relocate your battery.I use the stock exaust set up so I just drilled a couple
holes in the mudguard and ziptied my battery pack to the chassis.you can see where it is in the previous
photos showing the bottom of my chassis,it's located on top of the factory cut opening in the mud guard.see
arrow "F"
|
|
and finally,all that's left is to go out and dominate the competition.
|
|
**if you chose to attempt this modification,be aware that you do so under your own discretion.I will
not be held responsible should you damage anything in the process**
|
|